How to Flip Furniture for Profit: The Ultimate Beginner’s Guide to Trash-to-Treasure
Introduction
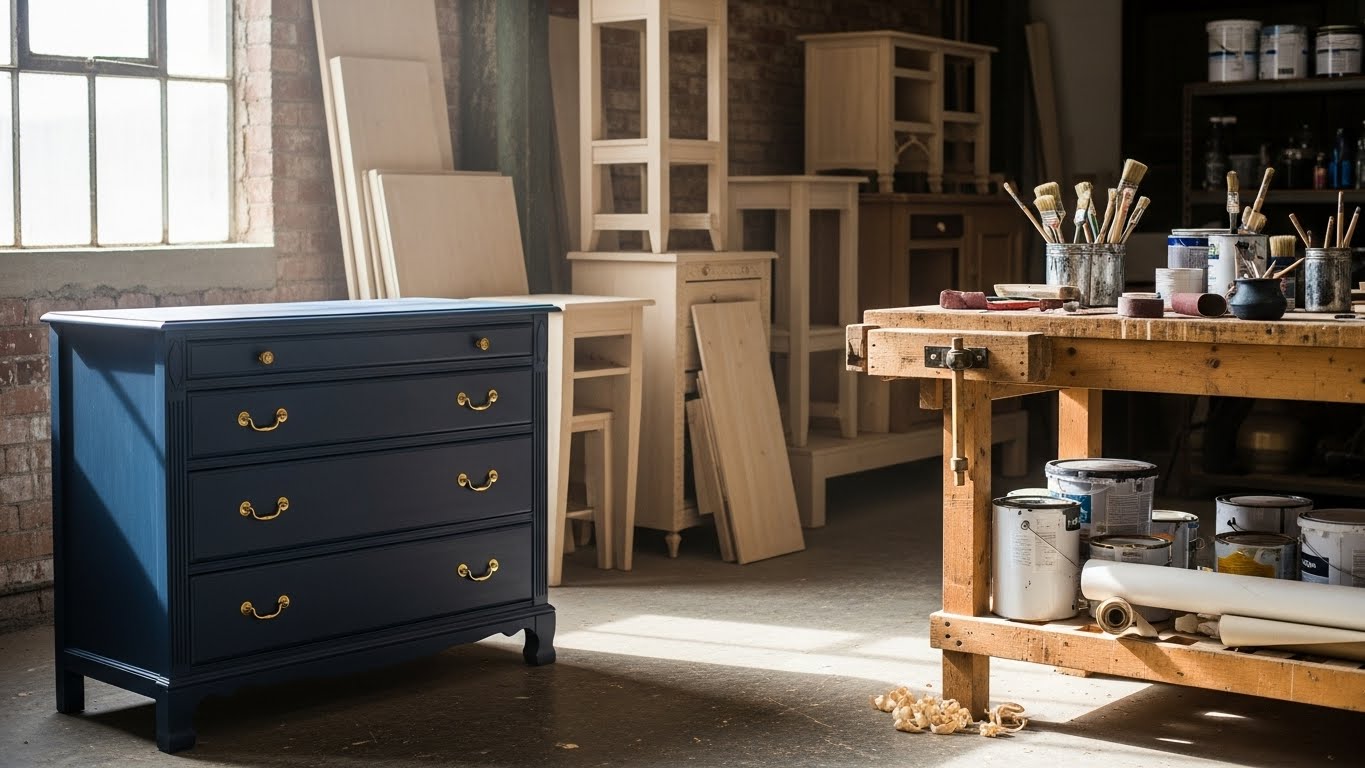
Learning how to flip furniture for profit is often sparked by a viral TikTok video of someone turning a hideous, orange 1990s dresser into a stunning, modern matte-black masterpiece worth $500. I admit, that is exactly how I got hooked. I was driving home one day and saw a beat-up wooden nightstand sitting on the curb with a “FREE” sign taped to it. It smelled like grandmothers and dust. My friends told me to leave it.
But I saw potential. I loaded it into my trunk, spent $30 on supplies, and a weekend of elbow grease later, I sold it on Facebook Marketplace for $150. That thrill is addictive. Furniture flipping is one of the few side hustles where you can start with almost zero capital and see an immediate return on investment. Plus, it keeps massive amounts of furniture out of landfills.
In this comprehensive 1200-word deep dive, I will teach you how to spot “good bones,” why you should never skip the sanding phase (even if the paint can says you can), and the exact strategy on how to flip furniture for profit without ruining your garage or your bank account.
1. The Hunt: Solid Wood vs. Laminate (Don’t Buy Junk)
The first rule of flipping is: You cannot polish a turd. If the furniture is made of cheap particle board (MDF) that is crumbling, no amount of paint will save it. You need to learn to identify quality.
The “Lift Test”: Try to lift one end of the dresser. Is it incredibly heavy? That usually means solid wood. Is it suspiciously light? Probably hollow particle board.
The “Drawer Joint” Test: Open a drawer. Look at where the front meets the side.
-
Dovetail Joints: (Interlocking teeth that look like puzzle pieces). This indicates high-quality craftsmanship. Buy it.
-
Staples/Glue: This indicates mass-produced factory furniture. Proceed with caution.
Laminate vs. Veneer:
-
Veneer: A thin layer of real wood over a cheaper core. You can sand this, but be careful not to burn through it.
-
Laminate: Basically plastic printed to look like wood. You cannot stain this. You must paint it using a special bonding primer.
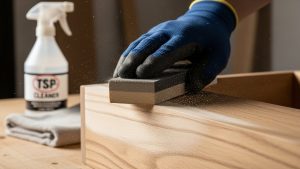
2. The Prep: Cleaning and “Scuff Sanding”
This is the unsexy part that everyone wants to skip. If you skip this, your paint will peel off in six months. Used furniture is covered in years of invisible grease, furniture polish (Pledge), and finger oils. Paint hates grease.
Step 1: TSP Cleaner Wash the entire piece with TSP (Trisodium Phosphate) or a degreaser like Krud Kutter. This chemically strips the oils.
Step 2: Scuff Sanding You don’t need to sand it down to bare wood (unless you are staining). You just need to “scuff” the surface to give the paint something to grip onto. Use 120-grit sandpaper and give it a quick once-over until the shine is gone. Think of it like exfoliating your skin before applying moisturizer.
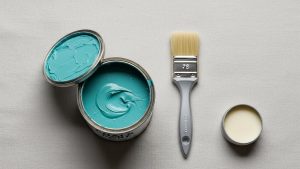
3. Choosing Your Paint: Chalk vs. Latex vs. Mineral
Not all paints are created equal. For beginners, I recommend Chalk Paint (brands like Annie Sloan or Rust-Oleum Chalked).
-
Pros: It sticks to almost anything without primer. It dries fast. It has a beautiful matte, vintage finish.
-
Cons: It is thick and can leave brush strokes if you aren’t careful. It must be sealed with wax or poly.
Latex Paint (Wall Paint): Don’t use the leftover paint from your living room walls. It is too soft and will remain “tacky” (sticky) for weeks. Books placed on top will stick to it. If you must use latex, use an enamel or cabinet-grade paint.
Mineral Paint: My personal favorite (brands like Fusion Mineral Paint). It has a built-in topcoat, is self-leveling (no brush strokes), and is incredibly durable. It costs more, but saves time.
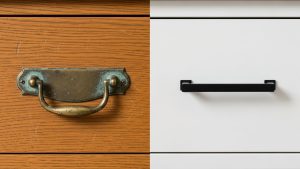
4. The Hardware Upgrade: Jewelry for Furniture
Sometimes, you don’t even need to paint. I have flipped dressers simply by removing the ugly, tarnished 1980s brass handles and replacing them with modern matte black or brushed gold pulls.
-
Rule: Measure the “center-to-center” distance of the screw holes exactly. If you buy the wrong size, you will have to fill the old holes with wood filler and drill new ones (which is a pain).
Cleaning Old Hardware: If the hardware is cool but dirty, boil it in a mixture of vinegar and water for 15 minutes, then scrub with a toothbrush. The decades of grime will fall right off, revealing the original shine.
5. Finishing: Wax or Poly?
If you used Chalk Paint, you must seal it. If you don’t, water rings from cups will ruin the finish immediately.
-
Furniture Wax: Traditional. You rub it on with a cloth and buff it off. It creates a soft, velvety sheen. However, it needs to be reapplied every year.
-
Polycrylic (Water-Based Polyurethane): Modern. You brush it on like clear nail polish. It creates a hard, durable shell. Warning: Do not use Oil-Based Polyurethane over white paint; it will turn yellow over time. Always use Water-Based (Polycrylic) over light colors.
6. Staging and Photography: The Money Shot
You can have the most beautiful dresser in the world, but if you take a photo of it in your dark garage with a bag of trash in the background, it won’t sell for a high price. Staging sells the dream.
-
Lighting: Take the piece outside or near a huge window. Natural light is mandatory.
-
The Background: Remove the clutter. A plain white wall is best.
-
Props: Place a small plant, a stack of books, or a candle on top. Show the buyer how it will look in their home.
-
Angles: Take a straight-on shot, a side angle, a close-up of the hardware, and a photo with a drawer open (to show it works).

Frequently Asked Questions (FAQs)
Q: How do I price my items? A: A good rule of thumb: Cost of Item + Cost of Supplies + (Hourly Wage × Hours Worked). Or, simply look at comparable items on Facebook Marketplace. If similar refurbished dressers are listing for $200, list yours for $220 and accept $200.
Q: What if I get brush strokes? A: Sand them down lightly with high-grit sandpaper (400 grit) between coats. Also, dampen your brush with water slightly before dipping it in the paint. This helps the paint flow smoother.
Q: Can I flip upholstered chairs? A: Reupholstery is a whole different skill set involving staple guns and fabric stretching. I recommend sticking to hard wood furniture (tables, dressers, nightstands) when you are a beginner.
Q: Where is the best place to sell? A: Facebook Marketplace is king for furniture because it is local (no shipping). Offerup and Craigslist are secondary options.
Conclusion
Mastering how to flip furniture for profit is a mix of creativity and manual labor. It requires you to look past the ugly orange varnish and see the modern potential underneath. It teaches you patience (watching paint dry is literal here) and negotiation skills. But the best part? The moment you hand over a piece you saved from the trash to a new owner who loves it. You made money, you saved the planet, and you created art. That is the ultimate win.